Applying and seating the drumhead
 Preparation and initial positioning
Assuming that you are content with the shape and condition of the shell from the previous section, place the batter head over the shell. Give it a spin and check that it moves freely around the drum. Orient the head so that it lies centrally on the drum and that the collar extends evenly beyond the bearing edge on all sides.
Purely as a matt![]() er of habit and to give consistent reference point, I orient the drum shell in the position I would see when I’m playing the kit, I position the logo on the heads at 12 o’clock which will normally match either the position of the manufacturers’ logo or the tom holder. Not only is this aesthetically pleasing but it also gives a marker for when you move around the drum during the tuning process.
er of habit and to give consistent reference point, I orient the drum shell in the position I would see when I’m playing the kit, I position the logo on the heads at 12 o’clock which will normally match either the position of the manufacturers’ logo or the tom holder. Not only is this aesthetically pleasing but it also gives a marker for when you move around the drum during the tuning process.
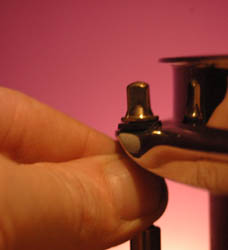 Place the hoop over the head and lower the tension rods into the lugs. Check that each lug allows its tension rod to turn freely, sticky lugs can be a real pain, use some lug lube or graphite oil to loosen sticky lugs. Give the drum a small shake to ensure that everything is sitting freely and naturally. Grip the threaded part of each rod and tighten clockwise until the washer just touches the hoop and no more, do not start to tighten the hoop down on top of the head yet, we are just making sure that everything is starting from an even position at this point. Re-check around the drum to ensure that everything is centralised and stable. Give it another shake.
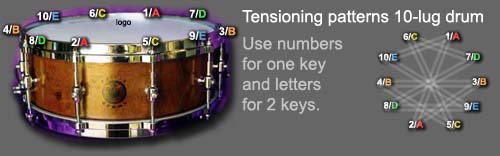
The order in which you tighten the lugs is important, similar to tightening the wheels of a car, you must equalise the tension across the drum at all times, so you should work in small increments, back & forward across the drum. Depending on the number of lugs on the drum, you will normally have up to 6 pairs (12 lugs) to deal with; from a tuning perspective, the more tuning points the better.
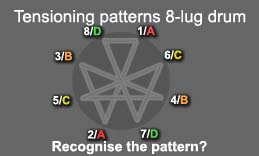 The main reason for locating the logo at 12.00 is that if you always start pair 1 (see two keys method) or lugs 1 & 2 (one key) for example with the tension rod ‘1’ immediately to the right of the logo, that means in the event that you lose track of the next move, you can track back to where you are in the procedure and continue the process. Eventually you will become familiar with the pattern for your drums and you will instinctively move in that pattern.
Following the appropriate tensioning pattern for your drum, hand t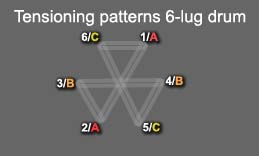 ighten both opposite lugs of pair one simultaneously until you feel a slight resistance or bite, move to pair two and subsequent pairs and turn them until you feel the same resistance. Return to pair one again and tighten again to a point of greater resistance, do this for the other tuning pairs in sequence 3 or 4 times around the instrument.
Tap the centre of the drum, do you hear a tone? If you do hear a tone then you are at the low end of the tuning range for that drum, it might be a bit ‘Boingy’ but it is a note and the lowest pitched note that the drum will support (useful tuning for the Indian Subsonic kick effect).
Using your fingertip, a drum stick or the end of your key, tap the head about 1” in from the rim at each lug point. You should have the same low, flat tone at each node. If there are any variances, finger tighten the appropriate rods to achieve a single tone. You should also notice that:
opposite lugs of a pair will deliver roughly the same tone as each other and you should adjust each lug of a pair evenly to maintain even tension.
Place your drum key on each tension rod of pair one and rotate them through 180 degrees (a half turn), move around the drum following the pattern you have been using. When you have finished the last pair, check again for evenness of tone. This time you will notice a much more resonant tone. If the drum is in good condition, the tension rods move freely and you have been accurate in your tightening of the tension rods, you should have the same note at all the points around the drum but with a different timbre in the centre of the drum.
When one tuning point on the head is at a different pitch to those adjacent to it, you will also find that the situation is pretty c losely mirrored at the opposite tension rod of the pair. If one pair is at a lower or higher pitch than all the others then you need to adjust the tuning at those lugs to bring them into line, at this point, very small turns at each lug should easily be enough; remember to move each lug of the pair by the same amount. If more than one pair are out of sync, i.e. the drum produces 3 or more tones, I advise tuning them all to match the pair that has the purest note of them all. You will find that in doing his you raise the overall pitch of the drum, or that other adjustments become apparent. Keep going until you have consistent tone, we’re not concerned about pitch at this point.
When tuning, you should tighten lugs instead of loosening, as loosening relies on the head slipping fractionally back over the bearing edge which is not always reliable. If you do need to loosen a tuning rod, loosen to below the required note and tighten up to the desired pitch.
With the head evenly tuned, start at pair 1 again and give each rod a further ½ turn using the key, after working your way around the drum again, check again for pitch in the centre and at each of the lug points and adjust as necessary. Repeat this procedure twice more with ½ turns or until the head is tuned well above where you would normally tune that size of drum.. The glue in the head will probably be heard cracking on the way, this is it ‘settling’ and is perfectly natural and expected.This will give you a highly pitched drum for your normal application, the idea of this is to place tension through the head which is greater than the normal playing tensions, this sets up the drum for seating.
Seating for a drummer is similar to a guitar player ‘stretching’ new strings to ensure that they don’t de-tune drastically under playing conditions. It takes up slack across the drum head but in particular it shapes the drum head to the bearing edge of the drum. There are two common ways of seating the head, weight and heat. Weight is by far the most common.
Place both hands (as if you were giving CPR heart massage) in the centre of the drum and gently increase the weight on the head until it starts to take your full bodyweight, ‘bounce’ gently 2-3 times. (NB if you are a more substantial guy or gal, kneeling in front and leaning forward will suffice). The glue will very noticeably be heard to crack at this point if it has not done so already, this is normal. When demonstrating the seating procedure to students or at a clinic I make sure that the drum is on a carpet or other slightly cushioned surface and I stand on the drum head. Make sure you have a sound drumhead first!
The second method is to use a hair drier and heat the edges. Heat is Mylar’s worst enemy and causes it to deform, however given the tension under which you have placed the head, heat will allow the Mylar to conform to the shape of the edges and give you a definite point of contact between the bearing edge and head. To do this simply direct the hairdryer at the edge of the head and move around the drum, it should take 10-20 seconds to complete the circuit of the drum. This process should take maximum 2 minutes, do not overdo it!!
The act of seating the head fulfils 2 critical functions.
- It stretches the head so it doesn’t need constant re-tuning; and
- It shapes the head to the bearing edge, thereby ensuring accurate and much easier macro tunability.
If you tap the head now you will find that the pitch will have lowered markedly from the pre-stretch tuning. Tune the head once more at the current pitch and re-apply your weight. This time it will have stretched less and should probably remain very close to being in tune.
Having seated the head, de-tune each pair of lugs in sequence by intervals of ½ a turn until it starts to get towards the low tuning range again. When you get there, ensure that the head is in tune again and you are ready to progress to tuning.
Next page – Tuning the batter head
1 thought on “Seating a Drum Head”
Comments are closed.